Oracle IoT Cloud Service: a starter
An introduction, with examples and tools, to the use of Oracle IoT Cloud Service.

Introduction.
With this article I would like to provide a set of information, notes, examples to allow those who want to start experimenting with the Internet of Things (IoT) technologies and to do so using Oracle IoT Cloud Service.
Many of the information you will find here is quite general and does not depend strictly on the adoption of the Oracle Cloud, as it is based on the adoption of standard protocols (ex: MQTT), Open tools (Java, Eclipse Paho, etc). To this information, for people less familiar with Oracle Cloud services, I added a series of notes that, as you will see, will allow you to start sending IoT messages to the Oracle Cloud in a couple of hours.
The notes were created to support a series of Workshops dedicated to IoT, organized as part of the activities of the Italian Business Innovation Team. Then, I decided to organize and publish them here on Medium, to make them available not only to the workshop participants but also to a wider audience of “IoT-Enthusiasts”.
The article is intended to be something between a divulgative document and what we call “How-to” in technical jargon. It will not be a rigorous and complete article to the point of being able to satisfy the most rigorous readers. But, I hope it is pleasant to read, obviously as clear and comprehensible as possible and, ultimately, useful.
A world of messages: MQTT.
Even if we live in a world where the HTTP protocol is widely used and abused, it is not very suitable for communication with “limited” (constrained) devices, with little memory and limited computational capacity. Do you want to understand which devices I’m speaking about? Well, imagine you want to create a small weather station with Arduino. Arduino is a microcontroller that falls into the category of “constrained devices”.
If we wanted to transmit a JSON message of a few bytes
{ “temp”: 22.5}
HTTP would add a far larger header (100 bytes?). It can work and in some cases even good if we have enough communication bandwidth, but it is fundamentally a waste of resources. And this non-efficient use is evident especially where the transmitter is a “small and limited device”, like an Arduino.
Furthermore, HTTP does not add any mechanism to guarantee transmission reliability, in addition to those provided by TCP. In other words, it does not provide any mechanism to check that a message arrives at its destination or is automatically retransmitted.
For this reason, by the end of the last century (!), A messaging protocol was created specifically for devices and networks with limited bandwidth, not completely reliable (lossy, with possible loss of messages): MQTT.
As much as we want to discuss here, we put three firm and clear points:
- it is a simple and efficient protocol (fixed header of 2 bytes);
- allows you to implement a reliable transmission, with retransmission (we talk about QoS);
- it is now an OASIS standard.
Last-but-not-the-least, MQTT is based on the “Publish & Subscribe” paradigm: the client publishes messages on one (or more topics) and the applications that want to receive the messages make the subscribe. To do so, you need a MQTT broker, which receives messages and publishes them for subscribers on topics.
The only real limitation of the MQTT is that it is based on TCP. So it can only be adopted by devices that can support a reliable TCP stack.
For our pleasant experiments we can use a simple but efficient and reliable broker: the broker, Mosquitto, hosted and evolved by one of the projects of the Eclipse Foundation.
On the project website we read: “the current implementation of Mosquitto has an executable in the order of 120kB that consumes around 3MB RAM with 1000 clients connected”. Amazing.
For the use cases explored here, the MQTT will be used for communication between devices (“devices”), which we assume small and limited, and an IoT Gateway. It will be only the IoT Gateway then to talk with the IoT Cloud.
MQTT client.
To create the piece of code on the “devices”, which must be used to send the data via MQTT messages to the broker, we will use the libraries provided by another memorable project of Eclipse: Paho.
Paho provides libraries for all the most used languages in the IoT field (Java, Javascript, Python, …). In our short but cheerful experimentation we will use two languages: Java and Python.
Publish&Subscribe
The scenario that we consider is the following: an MQTT broker is installed on the IoT Gateway. Devices send messages with data on separate TOPICs (eg: device/meteo1/data). On the Gateway there is software, written in Java, which subscribes to these TOPICs and, using an Oracle IoT client library, sends the data to the Oracle IoT Cloud Service.
The scenario considered is not, of course, the only one possible. But it is a valid option (if the boards with devices can use TCP and MQTT). Using the Publish & Subscribe paradigm, the device-gateway coupling is loose, which is a good thing.
The code contained in the SimpleMQTTSubscriber.java file (see Github repository, note below) is a code example, based on Eclipse Paho, to create a Subscriber, in Java, able to receive messages sent on an MQTT topic.
In summary, in the code you must define a callback function that is invoked whenever a message is received on the topic to which the subscription has been made. It is the task of the callback function to de-serialize the message, extract the interesting data and send it to the Cloud.
The second file, JSONMQTTSubscriber.java, shows how, using the Open Source GSON library, it is easy to de-serialize a JSON message.
Requirements
- environment (preferably IDE) with JDK 8; We typically use Eclipse
- environment with Python3 working (I would recommend the adoption of the Anaconda distribution)
To install:
- Paho library for Python: pip install paho-mqtt
- libraries for Java
A simulator
To simulate the data sent to the Gateway by a board equipped with N sensors, in the Github repository I have provided a Python program
meteosym.py
The program reads the data (true) from a csv file.
The command-line for launching is:
python3 meteosym.py dati.txt
In the program it is possible to specify some parameters:
- the time interval to be considered (ID1, ID2)
- the hostname of the MQTT broker
- the interval (in sec) between one sending and the next; changing it can help “to compress” time
The program simulates a weather station, able to collect not only interesting data from the point of view of environmental comfort (temperature, humidity) but also important data to assess air quality and pollution (air quality index, pm2 .5, pm10 …).
The choice made for the format of MQTT messages is to use the JSON format.
Steps to be made in Oracle IoT Cloud
These are, in short, the steps to be taken to be able to send messages to the Oracle IoT Cloud (IoT CS):
- create an application in IoT CS
- create a Device Model within this application
- register the devices
- create an exploration
- create an integration with an Enterprise Application
Application and DeviceModel.
The application we will use is called: WorkshopIoT. We can describe an ORacle IoT application as a sort of container, a Namespace, within which we define the DeviceModel, integrations, explorations.
The Device Model describes which data are sent by the Device or Gateway, the format (number, string …) of this data, etc. The Device Model is uniquely identified by a URN.
In the examples we will use a Device Model called AircareModel, which provides this data:
- temp
- hum
- light (in lumen)
- iaq (air quality index, lower-is-better)
- pm25
- pm10

The DeviceModel also provides two system attributes (latitude and longitude) that, if provided, allow the geo-location of the device.
The structure of the JSON message is represented by the following figure:

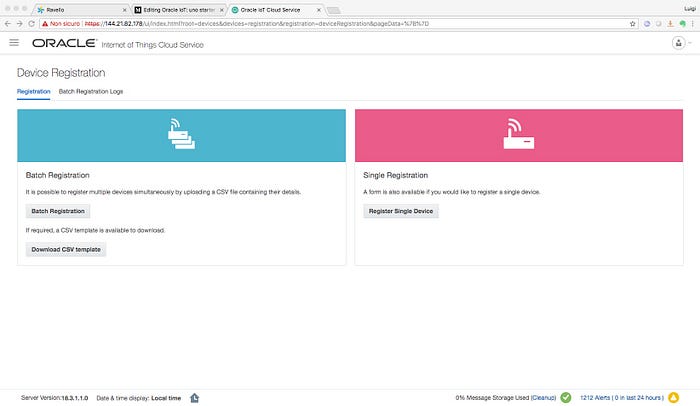
Device registration.
Before a device (both a DCD and a Gateway) can communicate with Oracle IoT CS, it must be registered.
Upon registration, a file is generated, the content of which is password protected, which contains the URL for access to the IoT CS and a series of “credentials” that will be used to allow access in a secure manner.
The file must be downloaded to the device and placed in a directory whose path is specified to the client. The password is used by the client application.
The registration of the device can be done in the following ways:
- from IoT UI, device for device (Single Registration)
- from IoT UI, in a batch mode for a list of devices
- using the IoT CS REST API
After device registration
Once registered, the device can be activated by code and can send messages to the IoT CS. The IoT CS can send also alerts and commands to the device (in this first article we will not cover the second part).
At this point, to get a first idea of how to communicate, you can examine the API dedicated to Directly Connected Devices (DCD): they are devices that communicate directly with IoT Cloud without the intermediation of a Gateway.
The code example is the file: SimpleDCDClient.java
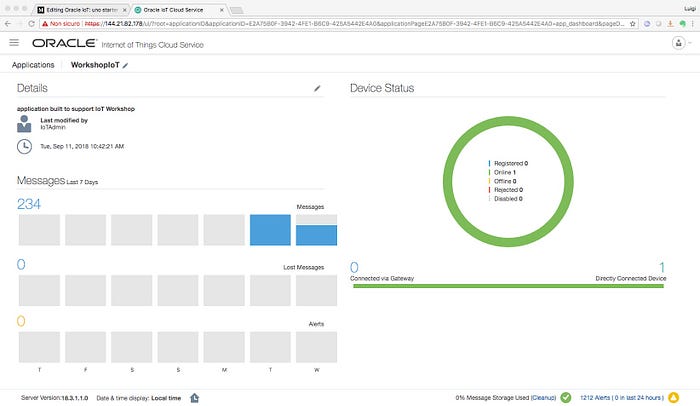
How to visualize message received from IoT CS
You can do that from application dashboard
How to build a simple MQTT subscriber that sends messages to IoT CS
Combining the code created to develop an MQTT subscriber with the DCD client code is quite simple to create a Java component that reads the messages from the topic subscribed, processes them and sends them to IoT CS. It is a first working example of the type of code to be implemented to implement an IoT Gateway (attention: a real Gateway is much richer in functionality and more complex).
The code that achieves this is given by the combination of the three files:
- JSONMQTTSubscriber.java
- SimpleDCDClient.java
- AircareMessage.java
In the lib directory of the github repository you will find the JAR files that make up the libraries needed to compile and execute the code.
The DCD Device Virtualization library consists of the device-library.jar file along with the json-20160212.jar helper file
REST API
Oracle IoT CS has a complete REST API, with which it is possible, after appropriate authentication, to perform virtually all operations on IoT Cloud.
For example, if we want to have information about the defined DeviceModel, we can use the invocation:
curl -X GET -k -u user:pwd -H ‘Accept: application/json’ https://iotserver/iot/api/v2/deviceModels/urn:com:oracle:aircare
In this example I used CURL as a client, but you can use any other REST client (Postman, etc ..).
With the REST API we can also read the last N (in the example N = 10) messages received from IoT CS:
curl -X GET -k -u user:pwd -H ‘Accept: application/json’ https://iotserver/iot/api/v2/messages?type=data&limit=10
The complete documentation relating to the API can be found here: Oracle IoT API REST DOC
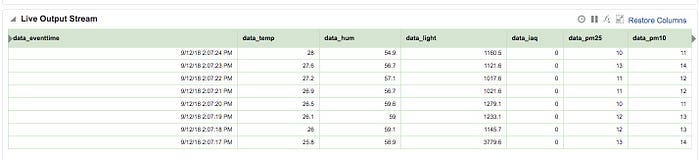
Esplorations
It is possible to carry out elaborations on a stream of messages (associated with a Device Model) using the Explorations.
For example, you can implement a filter: pass only messages where some data is outside a pre-defined range. It is the simplest implementation of an anomaly control system.
It is also possible to simply view incoming messages, selecting only the data we are interested in.
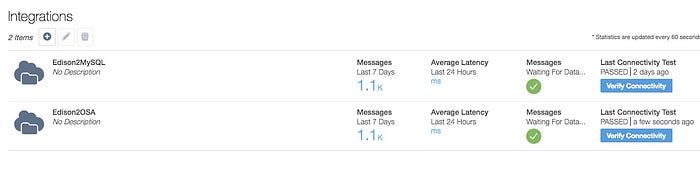
Integration with Enterprise Application
An Enterprise Application is an application external to Oracle IoT CS, to which we want to send a stream of messages, possibly filtered.
Oracle IoT allows declaratively to define an integration. It is sufficient for the application to display a REST endpoint to which messages can be sent via POST.
The only constraint is that the endpoint is exposed via HTTPS (we believe that security is very important). But if you want to use self-signed certificates in the test environment, you can upload the certificates to Oracle IoT CS.
The message format is the internal JSON format of Oracle IoT CS.
Obviously, if the integration with the Enterprise Application requires complex transformations, IoT should invoke a proxy, for example created within Oracle Integration Cloud.
A JavaScript example
The iotfmproxy.js file, contained in the github repository of the project, is an example of a proxy, built in Javascript, for IoT CS.
It is able to receive JSON messages via POST HTTP and after the necessary transformations, send them to Oracle IoT CS. The data model used is different (it is taken from a PoC for Fleet Monitoring) but the example can be used to understand how to use the Javascript API of Oracle IoT CS.
Obviously, for those not familiar, a certain complexity to the code structure is added by the asynchronous nature of NodeJS.
Oracle IoT Cloud Service Client Software
The version of the libraries used is 18.1.5.
The URL from which the download can be made is:Java SE client SW
Needed files are:
- device-library.jar
- json-XXXXXX.jar
- enterprise-library.jar
(To be more precise, only the first two JAR files are needed in a DCD client).
One last thing
The Github repository where you can find the data and code examples described in this article is as follows: MeteoSimulation.
Troubleshooting.
Some notes/suggestions for identifying problems:
- the same MQTT broker can not simultaneously connect two clients (also publishers and subscriber) with the same clientID; The second is disconnected from the broker. Thus, in the Python and Java code we can’t use the same clientID.
Link to documentation:
- https://docs.oracle.com/en/cloud/paas/iot-cloud/iotcp/overview-summary.html
- https://docs.oracle.com/en/cloud/paas/iot-cloud/iotsd/toc.htm
- How to create an instance of Oracle IoT Enterprise: https://medium.com/@juarezjunior/oracle-iot-cloud-service-how-to-create-the-iot-enterprise-service-instance-2d9bb7e46d1e
